![Trellis-MainLogo-AllWhite-01.png]](https://help.trellis.org/hs-fs/hubfs/Trellis-MainLogo-AllWhite-01.png?height=40&name=Trellis-MainLogo-AllWhite-01.png)
When a purchaser buys event tickets, every ticket is assigned to them by default. Purchasers can then assign each ticket to a guest by entering that guest's name and contact info, so guests receive their own ticket directly. This can be done right after checkout, or anytime later from the purchaser's donor account.
How to Assign Tickets
Right After Checkout
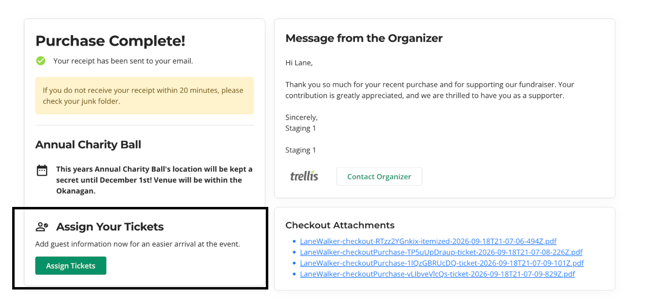
- Once checkout is complete, the purchaser lands on the Purchase Complete! confirmation page.
- Under Assign Your Tickets, they click the green Assign Tickets button.
- This opens the My Event Tickets page in their donor account, on the Purchased Tickets tab.
- For each ticket, they click the pencil icon and enter the guest's Name and Email, along with any other required fields, such as a meal choice.
- Once a ticket is assigned, it moves to the Assigned Tickets tab.
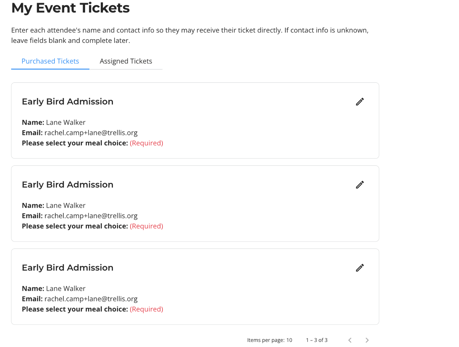
Heads Up! Required custom fields are skipped during checkout, so purchasers answer them when they assign each ticket. When reassigning an event ticket, these cannot be skipped, the purchaser must make a selection. Guests can update their custom field responses from their donor account.
From their Donor Account
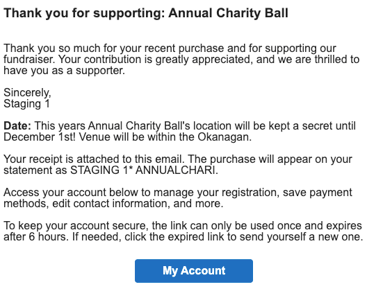
- When the purchase is complete, the purchaser will receive a confirmation email that contains a My Account button, which will log them into their account to reassign their tickets.
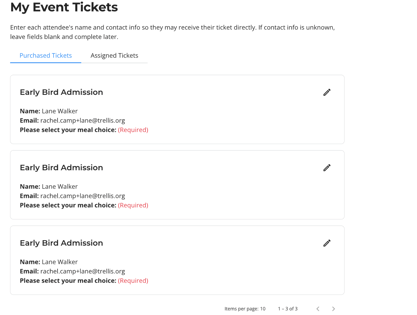
- On the Purchased Tickets tab, they find any tickets not yet assigned.
- They click the pencil icon next to a ticket and enter the guest's details, including any required custom fields.
Please Note: Login links can only be used once and expire after 6 hours. If a link has expired, the purchaser can click it to request a new one, or click Log In on the fundraiser page and enter their email. For more details on how login links work, please refer to this article.
How to Remind Purchasers to Assign Their Tickets
Unassigned tickets make seating, catering, and check-in harder to plan. We recommend sending purchasers a reminder through Trellis Messaging before your event.
- From your Dashboard, navigate to Messaging.
- Click Create Campaign.
- Click Create from template and select Reminder to Assign Tickets.
- Customize the campaign.
- Send the message now or schedule it for a date before your event.
For more information on how to create a messaging campaign, please refer to this article. If you'd like to schedule campaigns, please refer to this article.
Frequently Asked Questions
How is this different from how purchasers assign tickets previously?
Purchasers could always assign tickets to guests from their account, which allowed guests to manage their own registration and custom fields themselves. However, the attendees were required to visit multiple pages in order to edit their custom fields, add their contact information, and save a credit card. This was clunky and difficult, so attendees were unlikely to do it.
Now all required information is gathered in one simple and streamlined flow, so you can direct your attendees to one place on Trellis that will gather everything you need for the event.
Can the purchaser assign their tickets during checkout?
No, all ticket assignment now happens after checkout. This is for a few reasons:
- Purchasers are more likely to complete their checkout if they are only asked for essential information relevant to that purchase.
- Purchasers often don't know their guests' contact info at time of purchase. This often led to purchasers entering in incorrect contact info for their guests, in order to complete the checkout. That incorrect info then gets saved to the guests' account, causing downstream effects at the event. Purchasers are less likely to do this if they can assign tickets when it is convenient for them.
Can we configure if email or phone number is collected?
No, these are always collected as they are critical to offering the best attendee experience on Trellis.
Can purchasers skip required custom fields when assigning tickets?
No. Required custom fields are skipped during checkout, but they must be answered when the purchaser assigns a ticket. The guest can update their answer afterward.
What if the purchaser doesn't know a guest's email address yet?
They can leave the contact fields blank and come back later. They should not enter their own email in place of the guest's.
How does a purchaser get back into their account later?
Their purchase confirmation email includes a login link that logs them in directly. They can also click Log In on the fundraiser page and request a new link by email.