If you've sold sponsor tables or other grouped tickets offline, you can add those purchases to Trellis so that donors can reassign their own tickets to guests before the event.
Please Note:
The Bulk Upload feature does not work for Grouped Tickets, so if you need to ensure attendees stay grouped, please use the steps in this article.Before You Begin: Set Up a Grouped Ticket
Ensure that your grouped ticket (e.g., Sponsor Table, Table of 10) is properly set up in your fundraiser.
-
Create the grouped ticket in the Event Tickets section of the Fundraiser Builder
-
Choose a descriptive Ticket Name (this is visible to the donor)
-
Set the number of attendees per group
-
Set the ticket price to $0
-
Under Advanced Settings, mark the ticket as Hidden
-
Click Save and then Publish Changes

Steps to Add the Table Purchase Using the Sales Entry System
Open the Sales Entry System (SES)
-
From your Dashboard, find the fundraiser and click the ESM button to open the Event and Sales Manager
-
Log in using your Trellis credentials
-
Click Sales Entry System from the event tools menu
Complete the Purchase on Behalf of the Sponsor
-
Select the hidden grouped ticket (e.g., Sponsor Table)
-
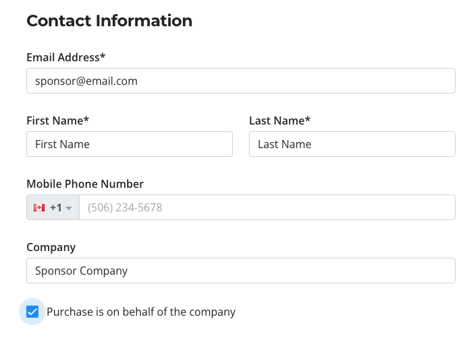
Enter the sponsor or donor’s information during checkout
Assign or Skip Ticket Assignment
-
If attendee names are unknown, click Skip Assigning Tickets
This will assign all tickets to the purchaser -
If you have names for some guests, assign those tickets now

Select an Offline Payment Method
-
Choose an offline payment method such as Cash, Cheque, Card – Offline, or Other
Note: If the ticket price is $0, this step will be skipped
Send Confirmation Email (Optional)
-
At the final step, you can choose to send a receipt email to the donor
This includes:-
An itemized receipt
-
PDF event tickets
-
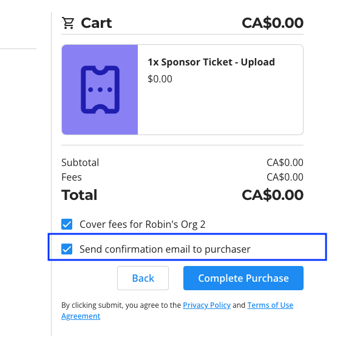
Complete the Purchase
-
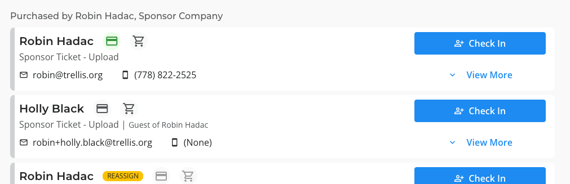
Once complete, the sponsor will appear in the Check-In Tool
-
A Trellis account will automatically be created for the purchaser

How Donors Can Reassign Their Tickets
-
Send the sponsor a link to your fundraising page
-
Ask them to click Log In in the top right corner
-
They’ll enter the email address used for the original purchase
-
A one-time login link will be sent to their inbox
They should not use a password


Once logged in:
-
Click on My Tickets
From the Assigned Tickets section, they can reassign tickets to their guests


For full instructions on how to reassign tickets, see: How to Assign Event Tickets You Purchased to Your Guests
When Tickets Are Reassigned:
-
Each guest will receive their ticket by email
-
Each guest will automatically have a Trellis account created
-
The Check-In Tool updates in real-time with guest info
Need Help?
Did this answer your question? If not, please reach out to our Product Engagement Team via the blue chat icon or email support@trellis.org.