Set Your Event Logistics (Date & Location)
-
Navigate to Fundraising Drivers > Event Tickets in the sidebar.
-
Click Edit Event Settings.
-
Date & Time: Set the Start and End times.
-
Location: Enter the address or select To be Determined from the drop down menu if you are still finalizing the venue.
-
Capacity: Set a limit on total attendees. The system will automatically prevent ticket sales once this number is reached.
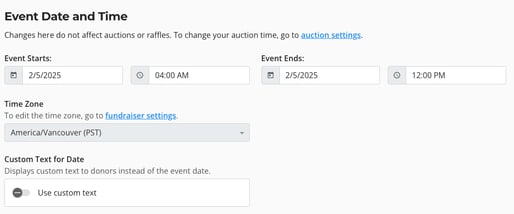
Use Custom Text for Date to display custom text to donors instead of the event date (e.g., "Doors Open at 6:00 PM" instead of standard formatting). You must still set a functional Start/End date.
Heads Up!
Changing the date here does not change the dates for your Auction or Raffle.
View and Manage Your Event Tickets
By default, several template tickets are created automatically—customize, delete, or add new ones as needed.
-
Edit: Click the Pencil Icon to customize a ticket.
-
Reorder: Click and drag the Six Dots to change the order tickets appear to buyers.
-
Duplicate: Use the Copy Icon to quickly duplicate a ticket type (great for "Early Bird" vs "Regular").
Pro Tip:
We recommend keeping the Complimentary Ticket in case you need to assign free access to Sponsors, volunteers, or staff without processing payment.
Creating a New Ticket
Click Add Event Ticket. You will need to choose between two types:
Single Ticket
-
Best for: General Admission, Individual Seats.
-
How it works: One ticket = One person.
Grouped Ticket
-
Best for: Tables, Golf Foursomes, Teams.
-
How it works: One purchase grants entry to multiple people.
-
Setup Example: For a "Table of 10," set Tickets per Group to
10.
Tax Receipts
-
Advantage Value: The fair market value of the benefits the donor receives (e.g., the cost of the meal, golf fees, etc.).
-
Tax Receipt Amount: The remaining portion eligible for a tax receipt.
- Advantage Description: A short description of the benefit a donor receives from this purchase. This appears on their tax receipt.
Advanced Settings
-
Ticket Visibility (Hidden Tickets): Set a ticket to "Hidden" if you want this ticket to only appear once a passcode is entered. Great for Sponsors or staff!
-
Sales Availability: Set if event tickets can always be purchased or if they have a timeframe.
-
Waitlist: Enable this to collect email addresses automatically if your event sells out.
-
Max Tickets Per Purchase: Limit how many tickets a single person can buy at once.
- Email Attachments: Allows you to add a custom attachment that is included with the purchaser's confirmation email. Note only one copy of the attachment is sent.
- Ticket PDF Description: Allows you to add a custom text to the event ticket PDF that is generated by Trellis. It appears under a heading "Additional Notes"
-
Custom Fields: Ask specific questions for this ticket type (e.g., "Shirt Size" or "Meal Choice").
- Promo Codes: Can be applied to receive a discount on event ticket.
Saving and Publishing
-
Click Save once you've finished editing your ticket
-
Then click Publish Changes in the top-right of our header to apply your updates
Once your tickets are published, you’re ready to start selling. Share your fundraiser page link with donors to let them select and purchase their tickets.
Frequently Asked Questions
Is it possible to customize the content and design of the event ticket PDF generated by Trellis?
No unfortunately the content and design of the ticket PDF is not customizable. However, you may add custom text to the ticket using the Ticket PDF Description field.
Can we disable the automatic event ticket PDF generation?
Yes, you can disable event ticket PDF generation from Event Settings > Generate Event Ticket PDFs. This applies to all your tickets - it is not possible to disable ticket generation for only certain tickets.
Can ticket purchasers skip assigning tickets during checkout?
Yes, by default we allow ticket purchasers to skip assigning tickets during checkout. This creates a smoother checkout experience for your purchasers, especially if they do not yet know who is coming. They can assign their tickets later from their account.
If you want to disable this, it is available under Event Settings > Event Reminder Emails.
Need Help?
Did this answer your question? If not, please reach out to our Product Engagement Team via the blue chat icon or email support@trellis.org.