1. Essentials to Complete Before Launch
Payments and Payouts Are Set Up
-
Ensure Stripe is connected and verified.
-
Related Guide: How to Set Up Payments
Confirm Auction Start and End Times
-
Go to Auction Settings and verify your dates and times are correct.
Important: You can change the end time while the auction is running, but once an auction closes, you cannot reopen it. Double-check your end date carefully.
Enable "Show silent auction tab to donors"
-
Go to Auctions in the builder sidebar. Toggle on "Show silent auction tab to donors." This adds a dedicated link in your site header for donors to access your auction directly.

Review All Auction Items
-
Click Auctions > Preview Auction. Look for missing images, typos in descriptions, or incorrect starting bids.
If there are errors, the platform will flag them with a red icon next to the Publish Changes button. Click the icon to resolve them before launching.

Enable Tax Receipts (If Applicable)
-
Action: If your items are eligible for tax receipts, ensure your receipting is set up.
-
Related Guide: How to Set Up Tax Receipts
2. Optional Enhancements
Connect Sponsors to Items
-
Create Sponsors via Auction Sponsors, then connect them to specific items. This gives your corporate partners high visibility every time someone bids on that item.
Add an Auction Preview to Homepage
-
In the Fundraiser Builder, click the Blue Plus (+) button and select Auction Preview. This displays your top six items directly on your landing page, enticing visitors to start bidding immediately.
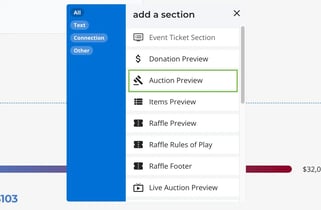
- If you are running a Live Auction, click the Blue Plus (+) button and select Live Auction Preview.
Customize the "Auction" Thank You Message
-
Set a specific message for users who only win auction items (distinct from ticket purchasers).
-
Related Guide: [How to Set Up Your Thank You Messages]
3. Publish Changes
Whenever you make updates to your settings, items, or design, click "Publish Changes" in the top right corner. If you do not click this, your live page will not reflect your work.
4. Ready to Go Live?
Now that you have checked all of the above time to make your page live! Here's the article on How to change you page status!
Need Help?
Did this answer your question? If not, please reach out to our Product Engagement Team via the blue chat icon or email support@trellis.org.