You can use Event Tickets to sell sponsorships and get your sponsor guests registered and ready to attend.
Benefits:
-
Sponsors can register their guests immediately
-
Less manual work and fewer transactions to manage sponsor attendees
-
Tickets can be hidden and unlocked with passcodes for exclusive access. This article goes over How to Use Passcodes to Reveal Hidden Tickets.
While sponsorships can be sold using our Items for Sale or Donation fundraising drivers, we don't recommend using these as it requires additional manual work to add attendees.
Setting Up Sponsorship Event Tickets:
-
In your fundraiser builder, under Event Tickets, add a new event ticket
- Under Ticket Type, choose Grouped Ticket. This allows you to sell a single ticket for a group of attendees, such as a table of 10.
- Fill in Ticket Name, Ticket Price and Number of Tickets Available

- For Grouped Tickets:
- Set Number of Groups Available
- Set Tickets per Group
(e.g., for 15 tables of 10 guests → Groups: 15, Tickets per Group: 10)
- Add a Description of what's included. Here you can put more information about what is included with the sponsorship.
- If tax receipting is enabled:
- Set Advantage Value (Fair Market Value)
- Set Tax Receipt Amount (receiptable portion)
- Complete any other fields, then publish your fundraiser.
Sponsors will now be able to visit your fundraising page, select their sponsorship level, and complete their purchase.
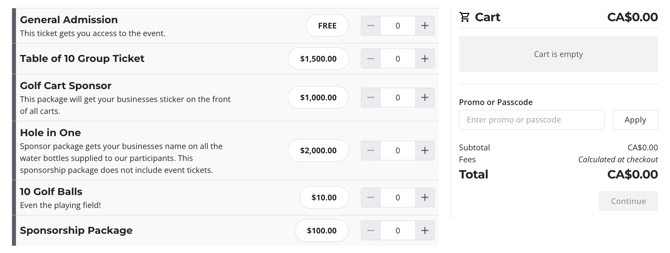
The sponsorship will appear with tickets and items on the select page before purchasing.
This article explains how to set up Event Tickets in further detail.
How to Register Sponsors on their Behalf:
If you would like to complete the transaction on the sponsor's behalf, or the sponsor has paid using check, bank transfer/ACH, or another method, you can use our Sales Entry System.
- From the Dashboard, click on the ESM button on your fundraiser.
- Log in to the ESM, then go to the Sales Entry System (SES).
- Select the sponsorship you wish to purchase.
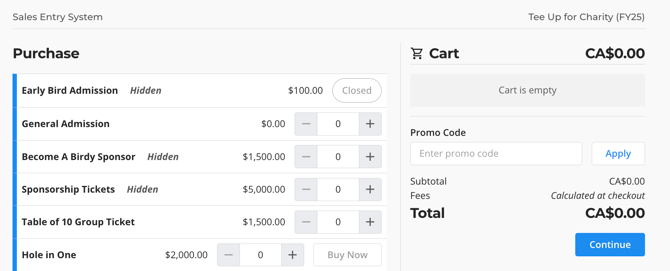
- Enter the sponsor's contact information. Note - our system requires an individual representative from the sponsor to make a purchase. A company alone cannot make a purchase.

- Assign tickets if any attendees known, or skip this step.
- Select a payment method: card, cash, check, card - offline, or other

- Review the purchase and complete.
Once complete, the sponsor's contact will receive the confirmation email, receipt and tickets. Their confirmation email will receive a link where they can log in to their account and reassign tickets themselves.
Frequently Asked Questions
How can I hide sponsorship tickets from the general public?
Set Ticket Visibility to hidden and optionally use a passcode to give sponsors exclusive access to their ticket type.
How can I feature available sponsorships on our home page?
Trellis does not currently have a feature to display sponsorship options on your home page. You can either use a Custom Section to highlight different packages, or upload a PDF brochure for potential sponsors to download.
We are currently working on building a sponsorship system with better marketing as part of our 2026 roadmap.
If we register on behalf of a sponsor, will they be able to log in and assign their tickets?
Yes - the sponsor can log in to their account using the email address you entered in the SES, and reassign their tickets from the My Tickets tab.
How can I manage sponsorship tables and add additional guests?
If you need to add additional attendees, you will need to use a single ticket (rather than a grouped ticket). We recommend having a hidden complimentary ticket on your fundraiser to give you flexibility to add attendees to sponsor tables.
When adding that attendee, you can use the SES to make the sponsor the purchaser and assign the ticket to that new attendee.
Or you can simply use the Add Attendee button in the Check-In Tool, and make sure that attendee has the same table number as the sponsor. Note that Add Attendee makes the attendee the "purchaser", so the transaction will not be linked back to the sponsor.
How can we invoice sponsors who haven't yet paid?
Our system currently does not have an invoicing system, however this is something we are exploring for later in 2026.
What if I have a large number of sponsor attendees to add at once?
Use the Attendee Bulk Upload to add many attendees at once. Note that bulk upload supports single tickets only, and each attendee becomes the "purchaser" of their ticket. No cards are charged. Follow these steps to submit to submit an attendee bulk upload.
Need Help?
Did this answer your question? If not, feel free to reach out to our Product Engagement Team via the blue chat icon or email support@trellis.org.