Getting Started with the Check-In Tool
The Trellis Check-In Tool is a web app used for checking in attendees for a fundraising event.
What Can You do With the Check-In Tool?
- Check-in Attendees – Allows the organizer to mark an attendee as present at an event.
- Edit Attendee Information – Includes an attendee’s name, email, phone number, table number, paddle number, mailing address, and any notes you may have for this attendee.
- Manage or Add their Payment Cards (Manage Cards) - Save a credit card to the attendees so that you can ensure there’s no delay closing out carts at the end of an event.
- Add Items to their Cart – Organizers can view and add items to the attendee’s cart. The organizer can also send the attendee the payment link or process the checkout on behalf of the attendee.
- Send Sign-in Link – Organizers can send the attendees a sign-in link to allow them to sign in on their own devices and be automatically signed into their Giving Account on the Trellis platform. This means faster purchases on their end, with all their saved information!
- View Purchase History – This allows the organizer to check the attendees’ purchase history for this fundraiser during the check-in and suggest future purchases to make during the event.
Configuring the Check-In Tool Features
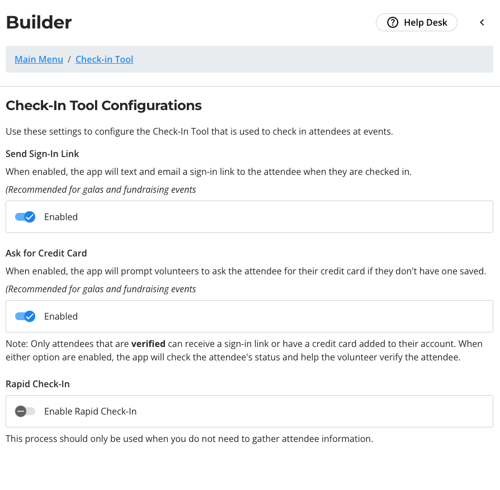
There are three features you can enable for your Check-In Tool that will allow your attendees to have a more seamless experience participating in your event.- Send Sign-in Link - the Check-In Tool will automatically send a sign-in link to the attendee once they are checked in. Attendees can then click the link on their device to access your fundraiser’s webpage and silent auction and make purchases on their own devices.
- Ask for Credit Card - the Check-In Tool will prompt volunteers to save a credit card for the attendees if they do not already have one saved.
- Rapid Check-in - if enabled, the Check-In Tool will not prompt volunteers to add or adjust any details for the attendees. It's designed for scenarios where the goal is to make sure guests are checked in, but the information of the attendees is not important.
To configure the Check-In Tool:
- Go to your Dashboard > Fundraiser Builder
- From Fundraiser Settings, click Check-In Tool
- Edit configurations based on your preference.
- Publish your fundraiser.

Device Compatibility
The Check-In Tool is designed to work with any smart device with wifi connection (ex. iPad). Most people prefer to use our Check-In Tool on a laptop, but it will work well on a tablet or smartphone as well.
- For Apple devices
- For the best experience, we suggest using the most recent iOS version supported by your device.
- To scan QR codes, you must use the Safari browser/app
- For Android devices
- To scan QR Codes, you must use the Google Chrome browser/app
- Do not the Check-In Tool through an embedded webview (like the Facebook app). Instead, open it directly in your browser app.
Accessing the Check-In Tool
- Open your device browser and go to this URL - https://esm.trellis.org/login.
- Make sure you bookmark this URL and have it ready to access in your device browser.
- There are two ways to log in to the ESM:
- The Volunteer Login - Sends a Magic login link to the email address entered. This is best when volunteers are using their own devices, as you need access to your email on that device.
- To learn how to assign Volunteers to your account to use the Check-In tool, click here.
- The Volunteer Login - Sends a Magic login link to the email address entered. This is best when volunteers are using their own devices, as you need access to your email on that device.
-
- The Organizer Login - Uses the same username and password you use to log into the dashboard. Note that organizers can also use the volunteer login, it leads to the same place.

If a volunteer cannot login, please check:
- The email address was added correctly in the dashboard, under Team Roles > Volunteers
- The volunteer is using a Magic link login and not the Organizer login.
If they still cannot login:
- Have a backup Fundraiser Manager account that the volunteer can use to log-in to the ESM.
Pro Tips:
An attendee must have a user account in order to save a credit card and bid in a silent auction. Accounts are automatically created for all ticket purchasers and ticket holders with unique email addresses. This also allows them to assign their event tickets to guests and make faster purchases. Below are some articles you may forward to your attendees in advance to get them ready:
How to assign event tickets to guests
How to view and edit tickets that someone else assigned to me
Get ready to attend an in-person event
Sign-In Links: For security, these links expires after 6 hours from the time they are sent and can only be clicked once. If the donors re-click an expired link, our system will prompt the them to request a new one.
Quick Links to Related Articles:
Click this link to download a PDF copy of this guide!
How to Log In to the Event and Sales Manager (ESM)
How to Check-in and Manage Attendees Using the Check-In Tool
How to Assign Volunteers to Check-In your Attendees
Did this answer your question? If not, please reach out to our Product Engagement Team via the blue chat icon or email support@trellis.org.